

Advertisement
The free 3D software Blender is released in version 4.3 and so is early in the release cycle again. Accordingly, the developers have again integrated several experimental functions, for example for light scattering in fog and water or for reflection from metal surfaces. Additionally, Blender now runs on Windows laptops with Arm chipsets. Blender 4.3 is now available for download for Windows, macOS, and Linux, as well as source code.
Windows on ARM and Vulkan support
There is now a special build available for testing Windows on ARM. If you want to use the Vulkan graphics interface not only for rendering, but for display as a whole, you can now select the experimental Vulkan backend in Settings in the System tab in the new “Display Graphics” subpanel.
The backend is primarily for testing, as users have to be prepared for poor performance and performance errors. Automatic refinement of surfaces can no longer be calculated by the graphics card.
Under Linux, you can now also access ray tracing acceleration on AMD cards using the HIP-RT ray tracing library, which, according to preliminary benchmarks, can be expected to provide 20 to 30 percent more performance.
New Hardware Requirements
Under macOS, support for GPUs from AMD and Intel is no longer available in the Metal backend. Hardware-accelerated rendering in Blender 4.3 under macOS only works with Apple silicon. Support for graphics cards with AMD Vega chips has been removed from the Cycles HIP backend. Users of Nvidia GPUs must now use at least driver version 495.89 on all platforms.
More flexibility in spreading light
When rendering volumetric effects such as fog or smoke, Blender previously only calculated the scattering of light rays using the “Heini–Greenstein” method. In version 4.3, additional methods have now been added, each covering specialist areas. “Rayleigh” is recommended for atmospheric scattering, “Fournier-Forand” for underwater scenes, “drain” for interstellar medium scattering, and “m” for clouds and nebulae.

In this Arctic scene, Christopher Tyler has rendered the fog from the previous “Heaney-Greenstein” method (above) with the new “Me” method (below).
Although 3D computer graphics attempt to simulate the propagation of light physically accurately, occasionally you want to be able to intervene and give up the path of realism. There is a tool for this “Light and Shadow Linking”. There, the effect of the light source may be limited to groups of objects. The standard example is a 3D shape that is backlit to stand out in the image. In Blender 4.3 you can now use the same function for light linking in both Eevee and Cycles.
Realistic looking textiles and metals
Graphic artists like to create irregularities with procedural noise, for example rust or clouds. The new “Gabor texture” is particularly suitable for creating random, interwoven bands, which is especially helpful for textiles.

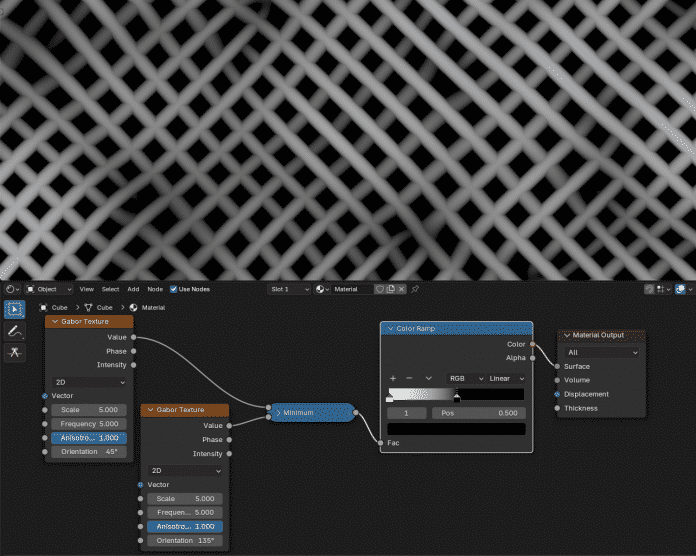
Interwoven bands are the major discipline of the new “Gabor texture”.
The “bidirectional scattering distribution function” (BSDF) in Blender determines how a surface interacts with light. For realistic representation of metals, there is now “Metallic BSDF”, which highlights settings that were previously difficult or impossible to access.
A special feature of metals is that they give different colors to the reflections depending on the angle of entry. The Metallic BSDF feature can control this effect in two ways. With “F82 Tint” you can directly define the main color and the edge color. With “Physical Conductor” the effect is controlled through two parameters per color channel. It is initially more complex, but promises more accurate and, above all, more realistic results.

Metals change color subtly at the edges. With the “Metallic BSDF” function, this effect can be physically controlled precisely using two colors.
Geometry Nodes: One for All
Blender 4.3 comes with a geometry node that processes all elements of the geometry at once: this is called “for each element”. Until now, something like this was possible in theory, but the solution was not very intuitive.

In this example, different stars are created through the “For each element” node.
(Image: blender.org)
Grease-Pencil: Painting and Animating in 2D
Geometry nodes can now also handle “Grease Pencil”, Blender’s integrated 2D painting and animation system. It interprets the brush stroke as a curve. Many nodes that can edit curves now also work with grease pencil strokes. However, the proposed conversion between curves and grease pencil strokes still does not work completely flawlessly.
Output: Bake first, then pack
The output of geometry nodes can be saved so that it does not have to be recalculated again and again if nothing changes. This process is called baking and the rendered data is saved in separate files. Blender 4 saves them directly to a .blend file if desired. This makes sharing easy.
Tools for Geometry Nodes
Geometry nodes are great for creating your own tools and helpers. To be able to use these as conveniently as possible, they can now be adjusted with the mouse using widgets (handles in the viewport). For example, a procedurally generated tree can be made larger or smaller using arrow symbols.

Example of a Gizmo built through geometry nodes. As a result, a red arrow is added to the layer in the 3D viewport, which can be used to scale the layer along the X axis.
unique names for objects
A special feature of Blender is that no two objects can have the same name. For example, if you name an object “Cube” and there already exists an object with that name, Blender automatically names the new object “Cube.001”.
Sometimes you want the new object to be explicitly named “cube”. To do this, you first had to rename the old object to “Cube Old”, for example, so that “Cube.001” could be called “Cube”.
Blender 4.3 makes the last step easier. If the user renames an object and the new name is a substring of the old name (“cube.001” to “cube”), that object takes precedence. If there is already a “Cube” object, it will be renamed to “Cube.001”.
warnings, information, debugging
Geometry nodes are integrated into Blender’s modifier stack. In Blender 4.3 you can now output errors, warnings, and general information here.
To make debugging easier, you can now name geometries within geometry nodes. Previously this was done indirectly by looping through the names of objects and collections. You can now also give a name to completely procedurally generated geometry and thus identify it in the spreadsheet editor.
3D Brush: Virtual Clay
Sculpting involves manipulating 3D objects such as virtual clay. Till now, 3D brush tool was available on the shelf. Blender 4.3 converts them to assets and sorts them accordingly in the asset shelf at the bottom of the screen. As assets, self-created brushes can be more easily shared with other users.

When sculpting, brushes can now be found in the asset shelf at the bottom of the screen. The tools for masking and filtering reside in the tool shelf on the left.
white balance
Color management for rendering and display in the viewport now supports white balance: white point can be defined through color temperature and tint, as in photo editing. Such white balance is now also possible in the compositor using the new “White Point” mode of the “Color Balance” node.
minimum distortion
If you want to place a two-dimensional image as a texture on a three-dimensional object, you can only do so with distortion. Blender provides many automations to minimize them. The new “Minimum Stretch” method achieves the optimal result iteratively and can be used both manually via the unwrap menu and automatically during a live unwrap.
(AKR)
 Blender 4.3: Control lighting for fog, smoke and metal


