

JavaScript has always played a vital role in the world of web development. Although it was initially developed to enable interactive websites, it started to flourish when client-side libraries like jQuery were released and has dominated for over a decade now. With the release of Node.js in 2009, the technology was finally introduced to the server side of web applications as well. However, a gap remains for a framework dedicated to crafting server-side rendered web applications. This gap was filled in 2015 by Gatsby, which allows developers to create server-rendered React applications and gained high popularity – but it was eventually surpassed in user preference by Next.js, the study said.The State of JavaScript 2022” Has shown.
Advertisement

Marius Obert is originally from the Black Forest in Germany and began his software development career as a UI developer in sunny California. During that time, he learned to love web technologies like JavaScript and the entire Node.js ecosystem in general. After several disgusting fights with CSS, he relocated to Munich and began working as a developer evangelist at Twilio.
Next.js offers file-based routing and many other built-in functionalities, which enable developers to focus on solving critical business problems. The most prominent feature of the framework is that the code functions smoothly on both the client and the server. This systematic fusion of the frontend and backend not only benefits the developer experience but also improves performance and search engine optimization (SEO). This seamless integration of client-side and server-side rendering within a single framework is also known as “island architecture,” as there can be client-rendered island components that are surrounded by a sea of server-rendered components.
This article will provide a guide to the latest changes within the framework and explain them with corresponding code snippets.
Creating a new project
Getting started with Next.js is very easy. Make sure you have Node.js installed, which comes with a terminal command npxallowing the combined download and execution of npm packages in one step. You can then set up a new project immediately by running the command npx create-next-app@latest,
The interactive prompt guides users through the required options, including the project name, TypeScript usage—a statically typed superset of JavaScript—, ESLint integration, Tailwind CSS inclusion, and adoption of the recommended app router. Set the project name to heise-demoand answer all the other prompts yes (Figure 1):

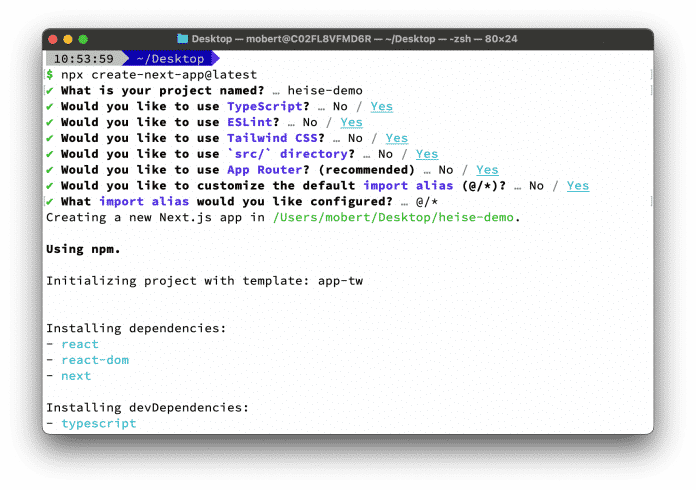
Bootstrapping a new project (Figure 1).
(Image: Marius Obert)
Start the local development server npm run dev And go to http://localhost:3000.
Once the initial page is ready, it can be styled using Tailwind CSS. Tailwind CSS is a modern, highly intuitive, usability-first CSS framework that allows developers to efficiently design and build elegant user interfaces. “Usability-first” means that instead of defining CSS rule sets, this development method uses utility or helper classes directly in the HTML code.
Beautifying the home page with Tailwind CSS
The primary goal of utility-first CSS and thus Tailwind CSS is to speed up the development process by allowing styles to be applied directly without constantly switching between HTML files and CSS files. It follows the paradigm of using finely tuned, reusable utility classes and applying them directly in the markup.
This approach reduces many of the complexities traditionally associated with CSS, such as selector collisions, cascade issues, and highly specific rules. It also leads to fewer CSS bugs and more consistency in user interface design by offering only a fixed set of classes and therefore styles to choose from. As proof of its usefulness, Next.js offers to configure the project for Tailwind CSS during the bootstrapping process.
Now, let’s experiment with Tailwind CSS’s classes using a previously bootstrapped Next.js app. Replace the contents of the src/app/page.tsx file with the code shown in Listing 1.
export default function Home() {
 const commonClasses =
   "flex w-1/2 h-1/2 items-center justify-center animate-pulse absolute";
 return (


 );
}
Listing 1: Page components, which is the basis of this demo
This code uses 16 of the several thousand Tailwind CSS classes. flex The class immediately sets a flex-box layout for the element, which makes designing flexible, responsive layout structures quite simple. w-1/2 And h-1/2 The classes designate each element to consume half of the parent’s width and height, respectively. The child nodes of an element are styled items-center And justify-center Aligned in the center both vertically and horizontally. animate-pulse The class applies a pulsing animation to the element, which can add some attractive dynamism to the design. select-none The class, applied to the main tag, prevents any text or element from being selected by the user.
absolute Specifies that the positioned element should be taken out of the normal flow, and therefore should not take up space when considering the position of other elements. The position of each div is defined through the use of classes such as top-0, right-0, left-0etc bottom-0. These classes have combination space div The top left, top right, bottom left, and bottom right corners of their parent element respectively.
In the end, everyone div A background color is also provided. bg-red-400, bg-yellow-400, bg-green-400etc bg-blue-400where numerical values define the tone of the color. This example shows the logic behind naming the classes, which allows developers with CSS experience to use them without having to learn new concepts.


